Imagine++ libraries are tested with minGW compiler, for which binaries are provided through installers. After installation, you can check the setup following this check guide.
All-in-one installer
This program will install all: CMake, Qt and Imagine++. You just need to run it and you can then ignore the rest of this page. The installation location will be "C:\ENPC".
Step-by-step installation (1/2)
If you want finer control on the components you install, just follow these steps.
- install Qt 6 for MinGW (https://www.qt.io/download-qt-installer). Choose the components to install: If you prefer to use VS Code instead of Qt Creator, you may forego its installation (but you still need the other components).
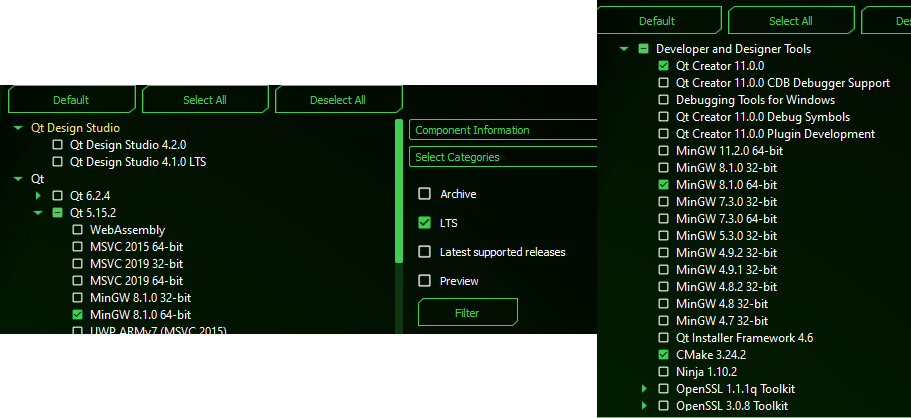 At the step "Select components" of the installation, choose Qt version 6 compiled with MinGW. The tools to install are Qt Creator, MinGW, CMake and Ninja. Select the same version of MinGW in the sections Qt 6.x.y and Build tools
Step-by-step installation (2/2)
At this step, only the prebuilt Imagine++ libraries are missing. Here are the ones compiled by minGW:
The installer above just extracts the prebuilt files and sets the environment variable Imagine_DIR. You may choose to do that yourself manually with the following archive:
Extract it in some location, and put the full path of the Imagine++ directory in the Imagine_DIR variable (Setting variables under Windows).
Compiling from source
If you need to recompile Imagine++, follow these steps. If the process fails somewhere, please check Troubleshooting.
1. Sources
Get the sources here https://imagine.enpc.fr/~monasse/Imagine++/downloads/ImaginePP-6.0.0-Source.zip and decompress them.
2. Tools
You should already have CMake and Qt installed (see Step-by-step installation (1/2)).
Optional:
3. Imagine++
- Launch Qt Creator and open project by selecting the file CMakeLists.txt.
 Opening the project can be done with the menu File or with the button Open Project.
 - Choose the "Release" configuration and click the button to configure
 You may want to change the build folder with the Browse button.
 - Click on the hammer button on the bottom left of the window. The build takes a few minutes, you can follow its progress on the window number 4 "Compile Output".
- Select the target "package", then click again on the hammer button to generate a zip file.
 Build the zip file
 - This creates the binary archive (extension .zip) in the build folder (the one you chose in the first step).
 The created zip package
 - Extract the folder wherever you want, and set the environment variable Introduction.
Go to Usage and check the tests.